SpringBoot UnitTest
이 글에서는 SpringBoot의 Controller에 대한 단위테스트 환경을 설정해보고 단위테스트를 작성하여 실행해 볼 예정이다.
단위테스트 환경 구성
먼저 단위테스트 환경을 구성하기 위해서 Gradle에 의존성을 추가하자.
testImplementation 'org.springframework.boot:spring-boot-starter-test'
의존성을 추가하면 Annotation 몇 개로 간단하게 단위테스트를 만들 수 있다. 아래는 오늘 테스트할 Controller Class이다.
@RestController
@RequestMapping("/test")
public class TestController {

    @GetMapping("/string")
    public String testString(){
        return "test";
    }

    @GetMapping("/json")
    public TestResponse getUserInfo(){
        return new TestResponse("홍길동", "010-3333-3333");
    }

    @PostMapping("/json/withbody")
    public TestResponse getEchoUserInfo(@RequestBody TestRequest request){
        return new TestResponse(request.getName(), request.getRegistrationNumber());
    }
}
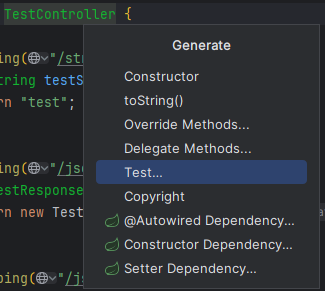
단위테스트 클래스는 위 클래스에서 Intellij Quick Fixed 기능을 사용하면 적절한 경로에 자동으로 생성된다.

Class 테스트
생성된 클래스에 사용할 중요한 Annotation은 MockMVC 환경을 구성해주는 @WebMvcTest 이다.
@WebMvcTest(TestController.class)
class TestControllerTest {

    @Autowired
    private MockMvc mockMvc;

    @Test
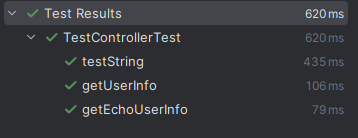
    void testString() throws Exception{
        mockMvc.perform(MockMvcRequestBuilders.get("/test/string"))
                .andExpect(status().isOk())
                .andExpect(content().string("test"));
    }

    @Test
    void getUserInfo() throws Exception{
        mockMvc.perform(MockMvcRequestBuilders.get("/test/json"))
                .andExpect(status().isOk())
                .andExpect(content().json("{\"name\":\"홍길동\",\"registrationNumber\":\"010-3333-3333\"}"));
    }

    @Test
    void getEchoUserInfo() throws Exception {
        //given
        String requestBody = "{\"name\":\"양사장\",\"registrationNumber\":\"010-8888-8888\"}";

        //when

        //then        mockMvc.perform(
                MockMvcRequestBuilders.post("/test/json/withbody")
                        .contentType(MediaType.APPLICATION_JSON)
                        .content(requestBody)
                )
                .andExpect(status().isOk())
                .andExpect(content().json(requestBody));
    }
}
MockMvc Instance를 가져오면 Controller 테스트를 위와 같이 수행 할 수 있다.

모든 구성요소를 적용한 테스트
Repository 테스트 같은 경우에는 단위테스트 시점에도 JPA Config를 적용해야 하므로 전체 컨텍스트를 로드하는 @SpringBootTest Annotation을 사용한다. DB연결, 보안 설정 등 실제 애플리케이션에서 사용하는 모든 빈과 설정이 테스트에 포함된다. 그렇기 때문에 테스트 속도가 조금 느려질 수 있다.
@SpringBootTest
@Transactional
class UserRepositoryTest {
    @Autowired
    private UserRepository userRepository;

    @Test
    public void testSaveAndFindById() {
        //given
        User user = new User("홍길동", "010-1111-1111");

        //when
        User savedUser = userRepository.save(user);
        User foundUser = userRepository.findById(savedUser.getId()).orElse(null);

        //then
        assertThat(foundUser).isNotNull();
        assertThat(foundUser.getName()).isEqualTo("홍길동");
    }
}
테스트를 하다보면 Repository와 MockMvc를 한 클래스에서 사용해야 할 경우도 생기는데 이때는 @SpringBootTest 와 @AutoConfigureMockMvc를 함께 적용한다.
@SpringBootTest
@AutoConfigureMockMvc
@Transactional
class EdocControllerTest {
	@Autowired
	private MockMvc mockMvc;
	//...
}
caution
DB에 영향을 줄 수 있는 단위테스트에는 @Transactional Annotation을 추가해야한다. @Transactional이 적용된 클래스는 테스트 후 자동 롤벡 된다.

댓글남기기