
SpringMVC 구현
🧩 Spring MVC 구현이란
정의
Spring MVC 구현은 서블릿 컨테이너 안에서 Spring MVC가 동작하도록 초기 설정과 서블릿 등록, 웹 설정을 구성하는 과정이다.
web.xml을 쓰지 않거나 최소화하고, Java 설정 중심으로 MVC 흐름을 만드는 것이 핵심이다.
WebApplicationInitializer로 서블릿을 등록할 수 있다.DispatcherServlet이 요청을 받도록 매핑해야 한다.WebMvcConfigurer로 뷰, 리소스, 메시지 컨버터 같은 세부 설정을 조정할 수 있다.
📁 폴더 구조
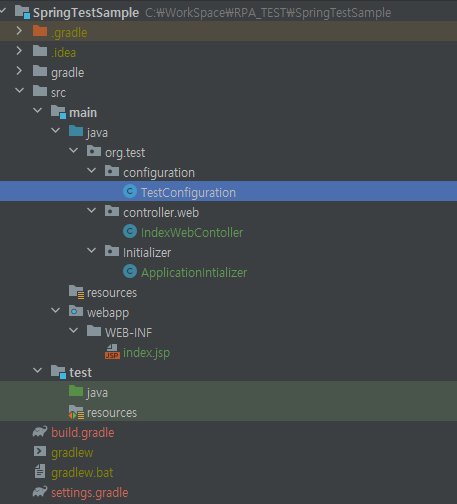
🧱 build.gradle
apply plugin: 'war'
apply plugin: 'java'

group 'spring.sample'
version '1.0-SNAPSHOT'

webAppDirName = "src/main/webapp"

war {
}

repositories {
    mavenCentral()
}

dependencies {
    implementation 'org.springframework:spring-web:5.3.22'
    implementation 'javax.servlet:javax.servlet-api:4.0.1'
    implementation 'org.springframework:spring-webmvc:5.3.8'
    implementation 'org.springframework:spring-context:5.3.22'

//    implementation 'org.springframework:spring-core:5.3.22'
//    implementation 'org.springframework:spring-context:5.3.22'

    implementation 'log4j:log4j:1.2.17'

    testImplementation 'org.springframework:spring-test:5.3.8'
    testImplementation 'org.junit.jupiter:junit-jupiter-api:5.8.1'
    testRuntimeOnly 'org.junit.jupiter:junit-jupiter-engine:5.8.1'
}

test {
    useJUnitPlatform()
}
junit: 단위 테스트log4j: 로깅spring-web:WebApplicationInitializer,DispatcherServlet,@RestController,@RequestMapping,@GetMappingspring-context:@ComponentScan,@Configurationjavax.servlet:ServletRegistration
🧩 WebApplicationInitializer
역할
WebApplicationInitializer는web.xml없이 서블릿과 스프링 컨텍스트를 초기화하는 진입점이다.
public class ApplicationInitializer implements WebApplicationInitializer {
    @Override
    public void onStartup(ServletContext servletContext) throws ServletException {

        AnnotationConfigWebApplicationContext webContext = new AnnotationConfigWebApplicationContext();
        webContext.register(WebConfigration.class);

        AnnotationConfigWebApplicationContext apiContext = new AnnotationConfigWebApplicationContext();
        apiContext.register(APIConfiguration.class);

        DispatcherServlet webDispatcherServlet = new DispatcherServlet(webContext);
        DispatcherServlet apiDispatcherServlet = new DispatcherServlet(apiContext);

        ServletRegistration.Dynamic webDispatcher = servletContext.addServlet("webDispatcher", webDispatcherServlet);
        webDispatcher.addMapping("/web/*");

        ServletRegistration.Dynamic apiDispatcher = servletContext.addServlet("apiDispatcher", apiDispatcherServlet);
        apiDispatcher.addMapping("/api/*");
    }
}
구성 포인트
AnnotationConfigWebApplicationContext로 설정 클래스를 등록한다.DispatcherServlet을 직접 생성해 매핑한다.- URL 패턴에 따라 웹용과 API용 서블릿을 분리할 수 있다.
루트 컨텍스트와 DispatcherServlet 분리 예시
@Override
public void onStartup(ServletContext servletContext) throws ServletException {
    AnnotationConfigWebApplicationContext rootContext = new AnnotationConfigWebApplicationContext();
	rootContext.register(APIConfiguration.class);

// Manage the lifecycle of the root application context
	servletContext.addListener(new ContextLoaderListener(rootContext));

	AnnotationConfigWebApplicationContext dispatcherContext = new AnnotationConfigWebApplicationContext();
	dispatcherContext.register(WebConfigration.class);

	// Register and map the dispatcher servlet
	ServletRegistration.Dynamic dispatcher =
	        servletContext.addServlet("web", new DispatcherServlet(dispatcherContext));
	//dispatcher.setLoadOnStartup(1);
	dispatcher.addMapping("/");
}
⚙️ Configuration
REST API 설정
@Configuration
@ComponentScan(basePackages = "org.infinity.server.controller.api")
public class APIConfiguration {
}
Web 설정
@EnableWebMvc
@ComponentScan(basePackages = "org.infinity.server.controller.web")
public class WebConfigration implements WebMvcConfigurer {
    @Override
    public void configureViewResolvers(ViewResolverRegistry registry) {
        InternalResourceViewResolver resolver = new InternalResourceViewResolver();
        resolver.setPrefix("/WEB-INF/");
        resolver.setSuffix(".jsp");
        registry.viewResolver(resolver);
    }
}
🧪 Test Controller
API Test
@Controller
@RequestMapping("/test")
public class apiTestController {
    @GetMapping("")
    @ResponseBody
    public String testString(){
        return "test";
    }
}
View Test
@Controller
@RequestMapping("/test")
public class webController {
    @GetMapping("")
    public ModelAndView getMainPage(){
        ModelAndView mv = new ModelAndView();
        mv.setViewName("test");
        return mv;
    }
}
🧩 WebMvcConfigurer로 조정할 수 있는 것
- 인터셉터 등록
- 뷰 리졸버 설정
- 정적 리소스 매핑
- 예외 처리 보강
- 메시지 컨버터 추가
- CORS 설정
⚠️ 주의사항
DispatcherServlet등록은 필수다.- API 전용과 화면 전용 설정을 섞을 때는 URL 패턴과 컨텍스트 분리를 먼저 생각하는 것이 좋다.
WebMvcConfigurer만 추가했다고 MVC가 완성되는 것은 아니다.- 설정 클래스 이름과 패키지 경로는 프로젝트 구조에 맞게 유지해야 한다.
📌 정리
- Spring MVC 구현은 서블릿 등록과 웹 설정을 묶어서 구성하는 작업이다.
WebApplicationInitializer가 시작점이고,DispatcherServlet이 요청을 받는다.WebMvcConfigurer는 MVC 세부 동작을 다듬는 설정 지점이다.
댓글남기기